Introduction
Talkyard is a community discussion platform which contains the main features from it’s competitors like StackOverflow, Slack, Discourse, Reddit, and Disqus blog comments. You can use Talkyard as a discussion forum, knowledge base, customer support platform and much more. In this tutorial, we will install Talkyard with SSL & Nginx as reverse proxy on Ubuntu.
Prerequisites to us Talkyard
Before you get started, there are few things you will need,
- A VPS server with Ubuntu 18.04 with at least 2 GB RAM. You can get a VPS from any of the providers like Linode, Vultr, or Digital Ocean. We are using Linode, for this guide.
Note: You can’t use shared hosting for Talkyard.
-
A subdomain with an available A record pointed at your server’s IP. For example forum.techshits.com
Install Talkyard in Ubuntu 18.04
We starting this tutorial assuming you have already created a new vps server with the requirements and you have root access.
Step 1 : Install git & English Language
Before downloading and install the Talkyard, install git and english as some of the minimum ubuntu builds missing the english.
apt-get update
apt-get -y install git vim locales
locale-gen en_US.UTF-8
export LC_ALL=en_US.UTF-8 LANG=en_US.UTF-8
Step 2 : Download installation scripts
Before downloading the installation scripts you have to change the directory. You have to download the installation scripts to /opt/ directory. Follow the below commands to change the directory and download the script from the repo.
cd/opt/

git clone https://github.com/debiki/talkyard-prod-one.git talkyard
The above command, will clone the talkyard repo and place it in a folder called ‘talkyard’. Before moving to the next step, cd into the Talkyard folder using command cd /talkyard/
Step 3 : Prepare Ubuntu
The below command will install required tools, enable automatic security updates for your talkyard server, simplify troubleshooting, and make ElasticSearch work. ElasticSearch is a distributed, free and open search and analytics engine for all types of data, including textual, numerical, geospatial, structured, and unstructured.
>./scripts/prepare-ubuntu.sh 2>&1 | tee -a talkyard-maint.log
Step 4 : Install Docker
We can begin the docker installation by entering the following command
./scripts/install-docker-compose.sh 2>&1 | tee -a talkyard-maint.log
Step 5 : Install Firewall
Install firewall aka UFW which stands for Uncomplicated Firewall, a program use to secure your server. It is enabled in most of the vps servers by default. If you are installing the talkyard in Google Cloud, or Linode, you can omit this step.
./scripts/start-firewall.sh 2>&1 | tee -a talkyard-maint.log
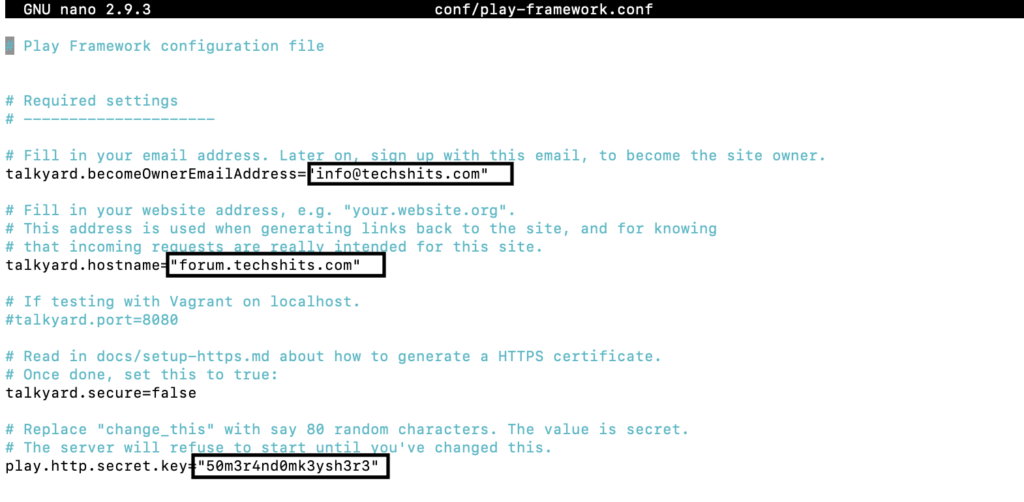
Step 6 : Edit config values
Open the play-framework.conf file and edit few required values as per installation. You will need to keep them in mind, as you will need the values to complete the installation in the end.
nano conf/play-framework.conf
And replace these values as per your requirement. And keep in mind that the server won’t start without editing the play.http.secret.key
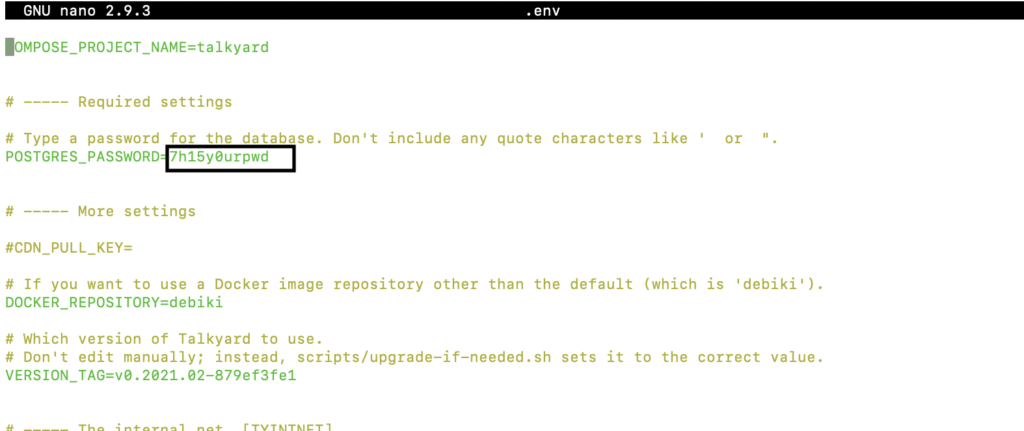
Now open the .env file using the below command and create a password for your Talkyard database, which will be created automatically. The default name of your database is takyard.
nano .env
Step 7 : Share Docker Compose configurations between files and your project
Depending on how much RAM your server has, choose one of the files and copy it to ./docker-compose.override.yml. For instance, we are using Linode’s $10 plan which has 2GB RAM. So we are running the below command.
cp mem/2g.yml docker-compose.override.yml
For servers with 1.7GB RAM
cp mem/1.7g.yml docker-compose.override.yml
For servers with 3.6GB RAM
cp mem/3.6g.yml docker-compose.override.yml
Step 8 : Install and start the latest version.
We have to run the upgrade-if-needed.sh file which is located in the scripts folder to install the Talkyard. It will install the latest version of the App, even if it’s named as upgraded. And this command will take few minutes to complete as it will download the dockers images.
./scripts/upgrade-if-needed.sh 2>&1 | tee -a talkyard-maint.log
Step 9 : Scheduling cronjobs to secure yourself from running out of storage and enable automatic upgrades.
Scheduling deletion of old log files
./scripts/schedule-logrotate.sh 2>&1 | tee -a talkyard-maint.log
Managing old backups
./scripts/schedule-daily-backups.sh 2>&1 | tee -a talkyard-maint.log
Enabling automatic upgrades, which will be helpful to keep your Talkyard up to date with the security patches.
./scripts/schedule-automatic-upgrades.sh 2>&1 | tee -a talkyard-maint.log
Step 10 : Configuring your fresh talkyard installation
Open your server IP or the host domain, for example forum.techshits.com and your see a page with a some text contents along with a continue button.
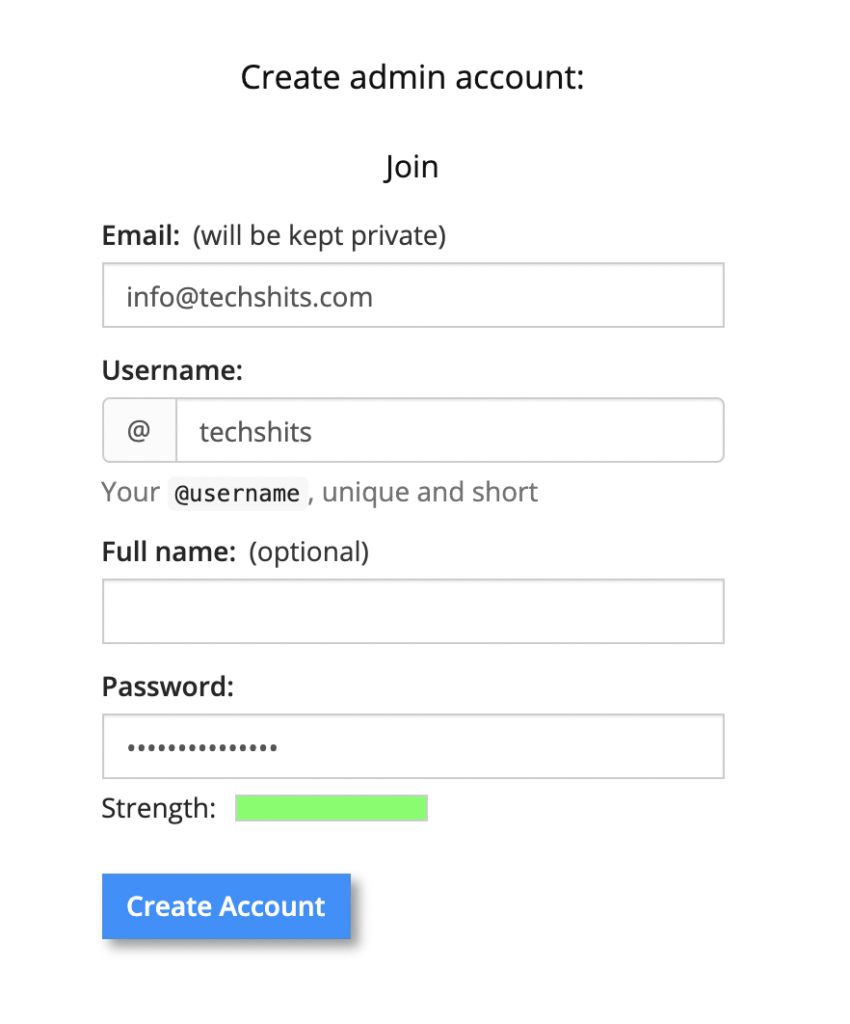
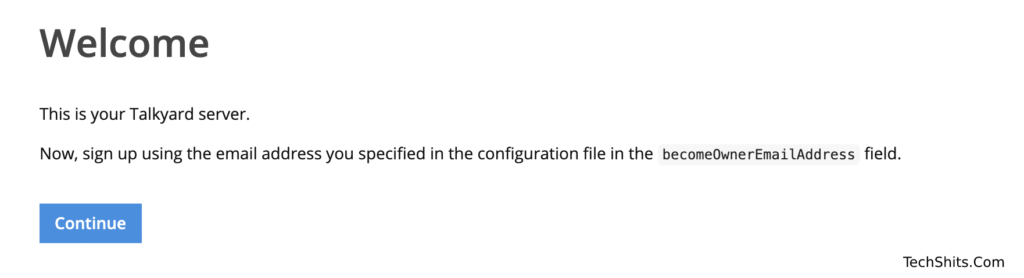 Click the Continue button. The first time you access Talkyard, you have to set up an admin user. Add your email (same mail that we added in the step 6), username, and password as requested and click on the Create Account button..
That’s all regarding the installation. After having deployed Talkyard, you may wish to configure it to use SSL so that people can log in securely. Follow the steps below to Install SSL for your Talkyard.
Enabling HTTPS to Talkyard or Installing SSL to Talkyard Server
Before starting, make sure that the subdomain you used to create your talkyard forum, has the SERVER IP pointed to it. You can achieve it by creating an A-Record that points to the IP of the VPS Server.

Once you completed this setup, you are good to go with the SSL installation process.
Step 1 : Install Certbot
Certbot is a client for Lets encrypt, which makes it’s easy to get the certs & renewing the ssl on your server. Use the following command to install the certbot.
apt install certbot
Step 2 : Generate HTTPS Cert
Generate the https cert using the below command. And make sure that you replace the [email protected] with your email and forum.techshits.com with your host name.
certbot certonly --config-dir /opt/talkyard/data/certbot/ --email [email protected] --webroot -w /opt/talkyard/data/certbot-challenges/ -d forum.techshits.com
You can check the generated cert in /opt/talkyard/data/certbot/live/ directory.
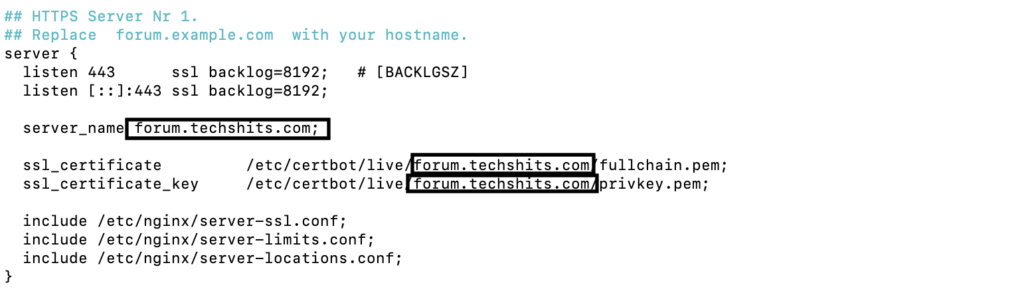
Step 3 : Edit nginx conf files.
Now we have to update the host name in the nginx config files. Open the file and replace the forum.example.com in server{…} block with your host name. In our case we replaced it with forum.techshits.com
nano /opt/talkyard/conf/sites-enabled-manual/talkyard-servers.conf
The above command will open the talkyard-servers.conf file. You have to replace the files and use ctrl+x to close the file.
Step 4 : Check the config files for errors.
You can check whether your configuration is okay or not with the following commands.
cd /opt/talkyard/

docker-compose exec web nginx -t
You should get output as in the below image. If you face any issues, please let us know in the comments, we will help you to sort out. 🙂

Step 5 : Reload Nginx config
Reload the nginx to start using the new nginx config with the HTTPS cert.
docker-compose exec web nginx -s reload
Step 6 : Check your forum for https
Wait for 20 seconds after completing the step 5 and then open https://forum.yourdomain.com in the browser and check whether you have installed the SSL correctly or not.

Step 7 : Configure server to use HTTPS
Open the play-framework.conf using the command below and set talkyard.secure to true.
nano /opt/talkyard/conf/play-framework.conf

Step 8 : Restart the application server.
Restart the application server to update the changes. This will take around 15-20 seconds to complete.
docker-compose restart app
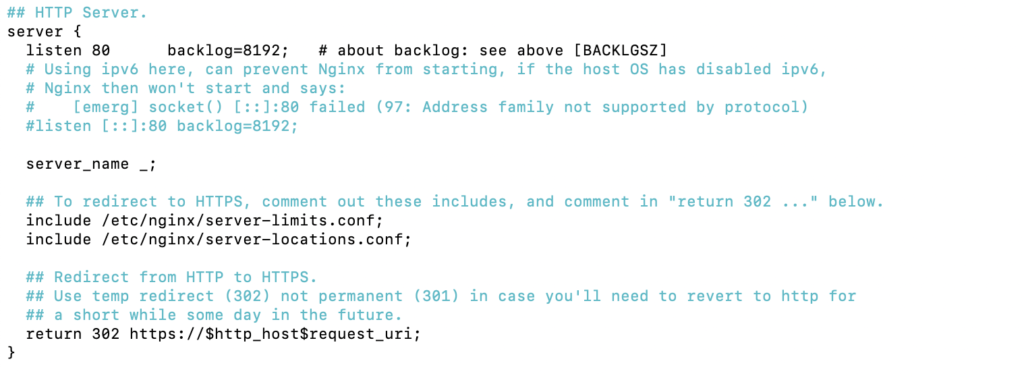
Step 9 : Setting redirection from HTTP to HTTPS
Now your forum is up and running, on https. We have to set the redirection from http to https, so that your site won’t serve both. Serving both will affects your forum’s SERP rankings.
For this you have to edit the talkyard-servers.conf file.
nano /opt/talkyard/conf/sites-enabled-manual/talkyard-servers.conf
Now remove the # (comment out) from the the lines starts with includes and return 302 https://….
Now run the check to know whether your nginx is okay or showing any error using step 4. And then reload the nginx using the step 5.
Step 10 : Checking the http to https redirection
Now open your forum with http (Eg: http://forum.techshits.com) and it should be automatically redirected to https://forum.techshits.com
Step 11 : Add cronjob to renew the SSL certificate automatically.
Run the below command to add cron jobs to renew the SSL automatically. Make sure that you are in /opt/talkyard/ directory.
./scripts/schedule-cert-renewal.sh 2>&1 | tee -a talkyard-maint.log
Step 12 : Check list of available cronjobs
You can make sure that your enabled auto renewal of your ssl cert by viewing the list of cronjobs. Use the below command to check the scheduled jobs. You will see the renew-https-certs.sh along with other cronjobs we added while installing the talkyard.
crontab -l

Conclusion
You can now start managing your Talkyard forum and let users sign up. You can learn more about Talkyard features on the official Talkyard features page. Keep in touch, we will cover Talkyard SMTP settings in the next post.
Credits : Talkyard
